


P&K 3950
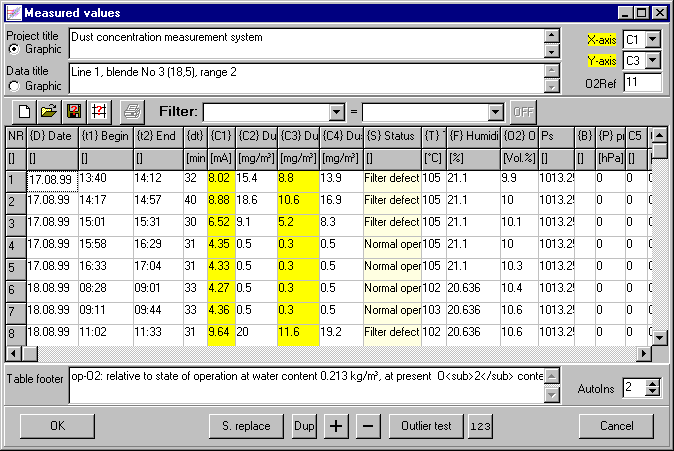
Measured values dialog
Product has been archived / Produkt wurde archiviert
In this form, at least a minimum of 3 value pairs are to be entered e.g. in C1 and C2. Press + for the first empty line, then set the focus into C1 and enter the first number; press TAB and enter the second number; another TAB appends a new row and selects C1 (see AutoIns). After entering all data one has to make sure the proper X-axis and Y-axis are selected and no row contains a deaktiv in S.
In the form Column settings (right mouse button click onto column title) title settings and column interconnections can be customized.
Project Title
One or more lines of text for the description of the project. This appears as report header or may appear as graphic title *.
Measurement Data Title
One or more lines of text for the description of the data table. This appears as data table header or may appear as graphic title *.
Graphic
This selection determines the choice of the graphic title.
X-Axis / Y-Axis
In these boxes the columns are to be chosen, which will be used as X or Y-axis. The selected columns will be shown in yellow.
O2-Ref
O2-Reference value.
| NR | This automatically generated number will be used to reference certain data records. This number can be shown in the report. |
| S | For the classification of the measured values in the diagram, six different symbols can be selected. These symbols are defined in the form Symbols. |
| B | To each data record, a description can be entered into this column. |
| C1 thru C7 | These columns are for the measured or for calculated values, which can be used as X or Y-axis. Functions can be defined in Column settings. |
| D, t1, t2 and dt | Column for date, begin and end time of measurement and the duration. The column dt can be calculated automatically, therefore the expression (t2-t1)*24*60 has to be entered in Column settings. The result is in minutes. |
| P, Ps, T, F and O2 | These fields are for pressure [hpa], temperature [°C], dampness [%] and O2. |
The order and the width of all columns can be changed by clicking into a column header or between column headers and dragging as desired. This is sensible if an order of values in the input is given in particular, because Tab has to be pressed just once in order to reach the next column.
Table Footer
One or more lines of text for the description of the data table. This appears as data table footer *
S. replace
Button to open the form Symbols / status replace, to replace the symbol for an entire range of data sets.
Dup + -
With these buttons it is possible to insert, delete or duplicate a data set.
Outliertest
see 3. Outliertest. When called via this button, the pending row will be changed to the outlier, if one was found.
123
Button to save the column order for reports.
AutoIns
Inserts a new row on TAB, when in the last row and in this column. See also next paragraph.
See 2. Measured values and Operation within the Tables.
* These texts might contain HTML tags like <sub>2</sub> for a 2 as in O2.